Het spuiten van een Modelvrachtwagen (ABS)
")
Het spuiten van je model Vrachtwagen met spuitbussen?
Allereerst is het belangrijk om te weten dat er twee grote verschillen zijn tussen de bestuurbare auto’s met een lexaan (transparant flexibele) body en de ABS (hard kunststof gekleurd) body’s. Beiden hebben een totaal andere manier van spuiten en hebben ook een andere soort verf nodig.
In de vorige editie hebben we je al alles verteld over het spuiten van de lexaan bodies. Laten we nu dan in het diepe duiken van het spuiten van de hard kunststof modellen (ABS, styreen) zoals veel gebruikt op de Model vrachtwagens maar ook sommige bestuurbare auto’s gebruiken ABS bodies. ABS/ hard kunststof is meestal wit of zwart van kleur maar je herkent het verschil al snel aan het feit dat het “hard” is waar lexaan buigzaam is en kan vervormen is dit bij hard kunststof niet de bedoeling
Het spuiten van een hard kunststof model 
Voorbereiding is alles en dat geldt misschien nog wel meer bij het spuiten van je model. Zorg dat je altijd een ruime omgeving hebt die ook schoon is. Het laatste wat je wilt is stof in je lak. We zien veel mensen die buiten gaan spuiten als je dat doet pas dan wel op dat je geen bomen en hoge planten in de buurt hebt staan vooral in het voorjaar en de zomer. Deze geven vaak de bekende gele stoflaag af welke je spuitwerk behoorlijk kan verpesten.
Stap 1: Schoonmaken en voorbereiden van je model
Voor een goed resultaat is het belangrijk dat de body goed schoon is voordat je gaat beginnen met het afplakken. Voor het beste resultaat zijn er speciale verf reinigers welke je kunt gebruiken. Maar het ouderwetse afwasmiddel werkt ook nog altijd gewoon goed (geen geurtjes of toevoegingen!). Het is heel belangrijk om na het wassen het model goed droog te maken met een pluisvrije doek. Je wilt geen stofjes achterlaten in je te spuiten onderdeel.
Nadat je het model hebt schoongemaakt kun je eventuele imperfecties plamuren doe dit altijd op een schoon model zodat je geen vuil in je te spuiten object schuurt. Na het plamuren en schuren maak je dan ook het model weer opnieuw schoon zodat je geen resten achter laat. Let wel op dat niet alle plamuren even goed tegen water kunnen en zorg dat je plamuur echt volledig uitgehard is. Vocht in je plamuur is het laatste wat je wilt.
Ben je klaar met het strak maken van je model dan wordt het tijd om hem echt voor te bereiden. Voor een goede hechting van de verf is het belangrijk dat de ondergrond niet alleen goed schoon is maar ook wat opgeruwd wordt. Dit kun je eenvoudig doen met een scotchbrite schuurpad hiermee ruw je het oppervlakte iets op wat zorgt voor een beter hechting. Na het opruwen maken we het model opnieuw schoon en kunnen we gaan beginnen met het eventueel afplakken en daarna spuiten van het model.
Stap 2: Het aanbrengen van de grondverf
Om goed te kunnen spuiten is het belangrijk dat je de bus op kamertemperatuur hebt of iets warmer. Een veel toegepaste truc is om de spuitbussen in handwarm water te plaatsen (ca 40 graden) om de druk iets te verhogen en het spray effect constanter te maken. Uiteraard blijft schudden van de spuitbus van groot belang om de verf goed te verdelen door de bus heen want je wilt geen spetters.
Bij het spuiten is het altijd van belang dat je omgeving niet alleen schoon is maar ook dat het niet regent zelfs als je binnen spuit zal de luchtvochtigheid van buiten invloed hebben op je lak. Nu zijn de tamiya verfen hiervoor minder gevoelig maar het beste is om het op een droge dag te doen zonder dat het mistig is geweest. De temperatuur moet tussen de 15 en 25 graden zijn voor het beste resultaat.
We beginnen altijd eerst met het aanbrengen van de grondverf. De grondverf heeft twee toepassingen. Het zorgt voor een betere hechting van de echte lak kleur op je model maar ook geeft het je een neutrale basis voor de kleur zodat je geen kleurverschil krijgt als je basis kunststof meerdere kleuren heeft. Daarom vind je grondverf ook in diverse basis kleuren (wit, licht grijs, grijs, bruin, roze). Afhankelijk van je eind kleur bepaal je de juiste kleur grondverf.
- Wit: Voor lichte kleuren (wit, licht blauw, licht groen etc.)
- Licht grijs: Voor midden donkere kleuren maar ook kleuren die moeilijk dekken (geel, oranje)
- Grijs: Voor donkere kleuren (zwart, donkerblauw, donkergroen etc.)
- Bruin: Voor donkere kleuren met rood/bruin tinten
- Roze: Voor felle rode kleuren
Grondverf breng je in dunne gelijke lagen aan net zo lang tot je model een egale kleur heeft gekregen. Je houdt de spuitbus op een afstand van ca 20-30cm (zie bus specificaties bij andere merken dan Tamiya) en brengt de verf in een zijwaartse beweging aan. Je begint al met spuiten een fractie voor je boven het model zit en stopt pas nadat je over het model heen bent. Op deze manier zorg je ervoor dat ook de randjes goed gedekt zijn. Tussen de lagen door laat je de verf ca 30 minuten drogen je kunt dit vooral goed zien als de verf geen natte vlekken meer toont wacht je nog minstens 15 minuten voor het aanbrengen van de volgende laag. Bij het spuiten van dikke lagen wordt de droogtijd ook direct veel langer!
Zie je nog wat imperfecties dan is dit het moment om je model nog een keer opnieuw te schuren zodat je echt een strak resultaat krijgt. Doe dit met een waterproof schuurpapier korrel 400 – 600. Hiermee kun je goed corrigeren zonder gelijk alles weer weg te schuren. Na het schuren maak je het model opnieuw schoon en breng je een nieuwe laag grondverf aan net zolang tot je tevreden bent met het resultaat.
Op het moment dat je grondverf geheel dekkend is kunnen we verder gaan met het daadwerkelijk spuiten van je model en het afplakken van de eventuele lijnen. Bij dikkere spuitbusverf zoals Motip of echte autolakken kan het aan te raden zijn om tussen de lagen door met korrel 1000 – 1500 te schuren voor het opruwen van de lak. De Tamiya lakken hebben dit niet nodig en zijn ook veel dunner wat zorgt voor behoud van de details in je model. Echter als je deze gaat schuren zal je al snel door de laklaag heen zitten.
Stap 3: Afplakken van je model 
In tegenstelling tot lexaan bodies bestaan de hard kunststof modellen veelal uit meerdere onderdelen. Als dit je eerste model is die je gaat spuiten maak het dan niet te moeilijk voor jezelf en begin met een enkele basiskleur. Wil je toch met lijnen werken monteer het model dan zodat je de lijnen door kan laten lopen over de meerdere onderdelen. Let vooral op dat je zo min mogelijk vette vingers achterlaat want dit heeft direct effect op je spuitwerk (vinger afdrukken/ slechte hechting/ vlekken). In tegenstelling tot lexaan bodies spuit je de hard kunststof bodies gewoon vanaf de buitenkant wel kan het soms verstandig zijn om de binnenkant af te plakken om nevel te beperken.
Maak voor het afplakken van het model gebruik van een goede tape welke geen lijm resten achter laat. Zowel Tamiya als Revell hebben zeer goede en vooral fijne afplak tape. De goedkope schilders tape van de bouwmarkt is vaak geen goed idee deze laat al snel lijmresten achter op je model.
Bij het spuiten van meerdere kleuren is het belangrijk om eerst de lichte kleuren te spuiten en dan de donkere. Op deze manier voorkom je dat je heel veel verf moet aanbrengen om een goed effect te benaderen.
Stap 4: Het daadwerkelijk spuiten van je model
Heb je alles goed en netjes afgeplakt? Zitten er geen luchtbellen onder je tape randen of opstaande randjes dan kunnen we gaan beginnen. Zoals we al zijden werk altijd van donker naar licht. Anders zal de donkere verf door de lichtere kleur heen komen in je spuitwerk.
Met grondverf gaven we je al de tip om vloeiende zijwaartse bewegingen te maken waarbij je al begint met spuiten voor je op het model zit en pas stopt nadat je over het model heen bent. Bij de kleur lak is dit nog veel belangrijker. Als je te laat start zul je aan het begin een donkere vlek krijgen waar de lak begint en als je te vroeg stopt is het einde van je model niet volledig dekkend in kleur. Let dus erg goed op de spuit afstand van 20-30cm maar nog belangrijker spuit in een gelijke baan.
Net als met de grondverf is het aan te bevelen de spuitbussen iets warmer te maken voor een constante druk. Dit maakt het spuiten makkelijker en zorgt voor een beter resultaat. De daadwerkelijke lak kleuren kun je 1 voor 1 aanbrengen maar gebruik ook hier nog steeds dunne lagen voor een goed resultaat. Te dik spuiten zorgt ervoor dat je al snel druipers of vlekken in je lak krijgt en dat verpest je spuitwerk al heel snel.
Net als met de grondverf geldt dat bij het gebruik van autolakken er het beste tussen elke laag iets opgeruwd kan worden. Alleen bij je laatste laklaag doe je dit niet meer. Gebruik je meerdere kleuren of fijne lijnen dan is het advies om niet tussendoor te schuren.
Tip! Gebruik je metallic kleuren of kleuren met een speciaal effect
Stap 5: Tijd voor de echte glans (Blanke lak)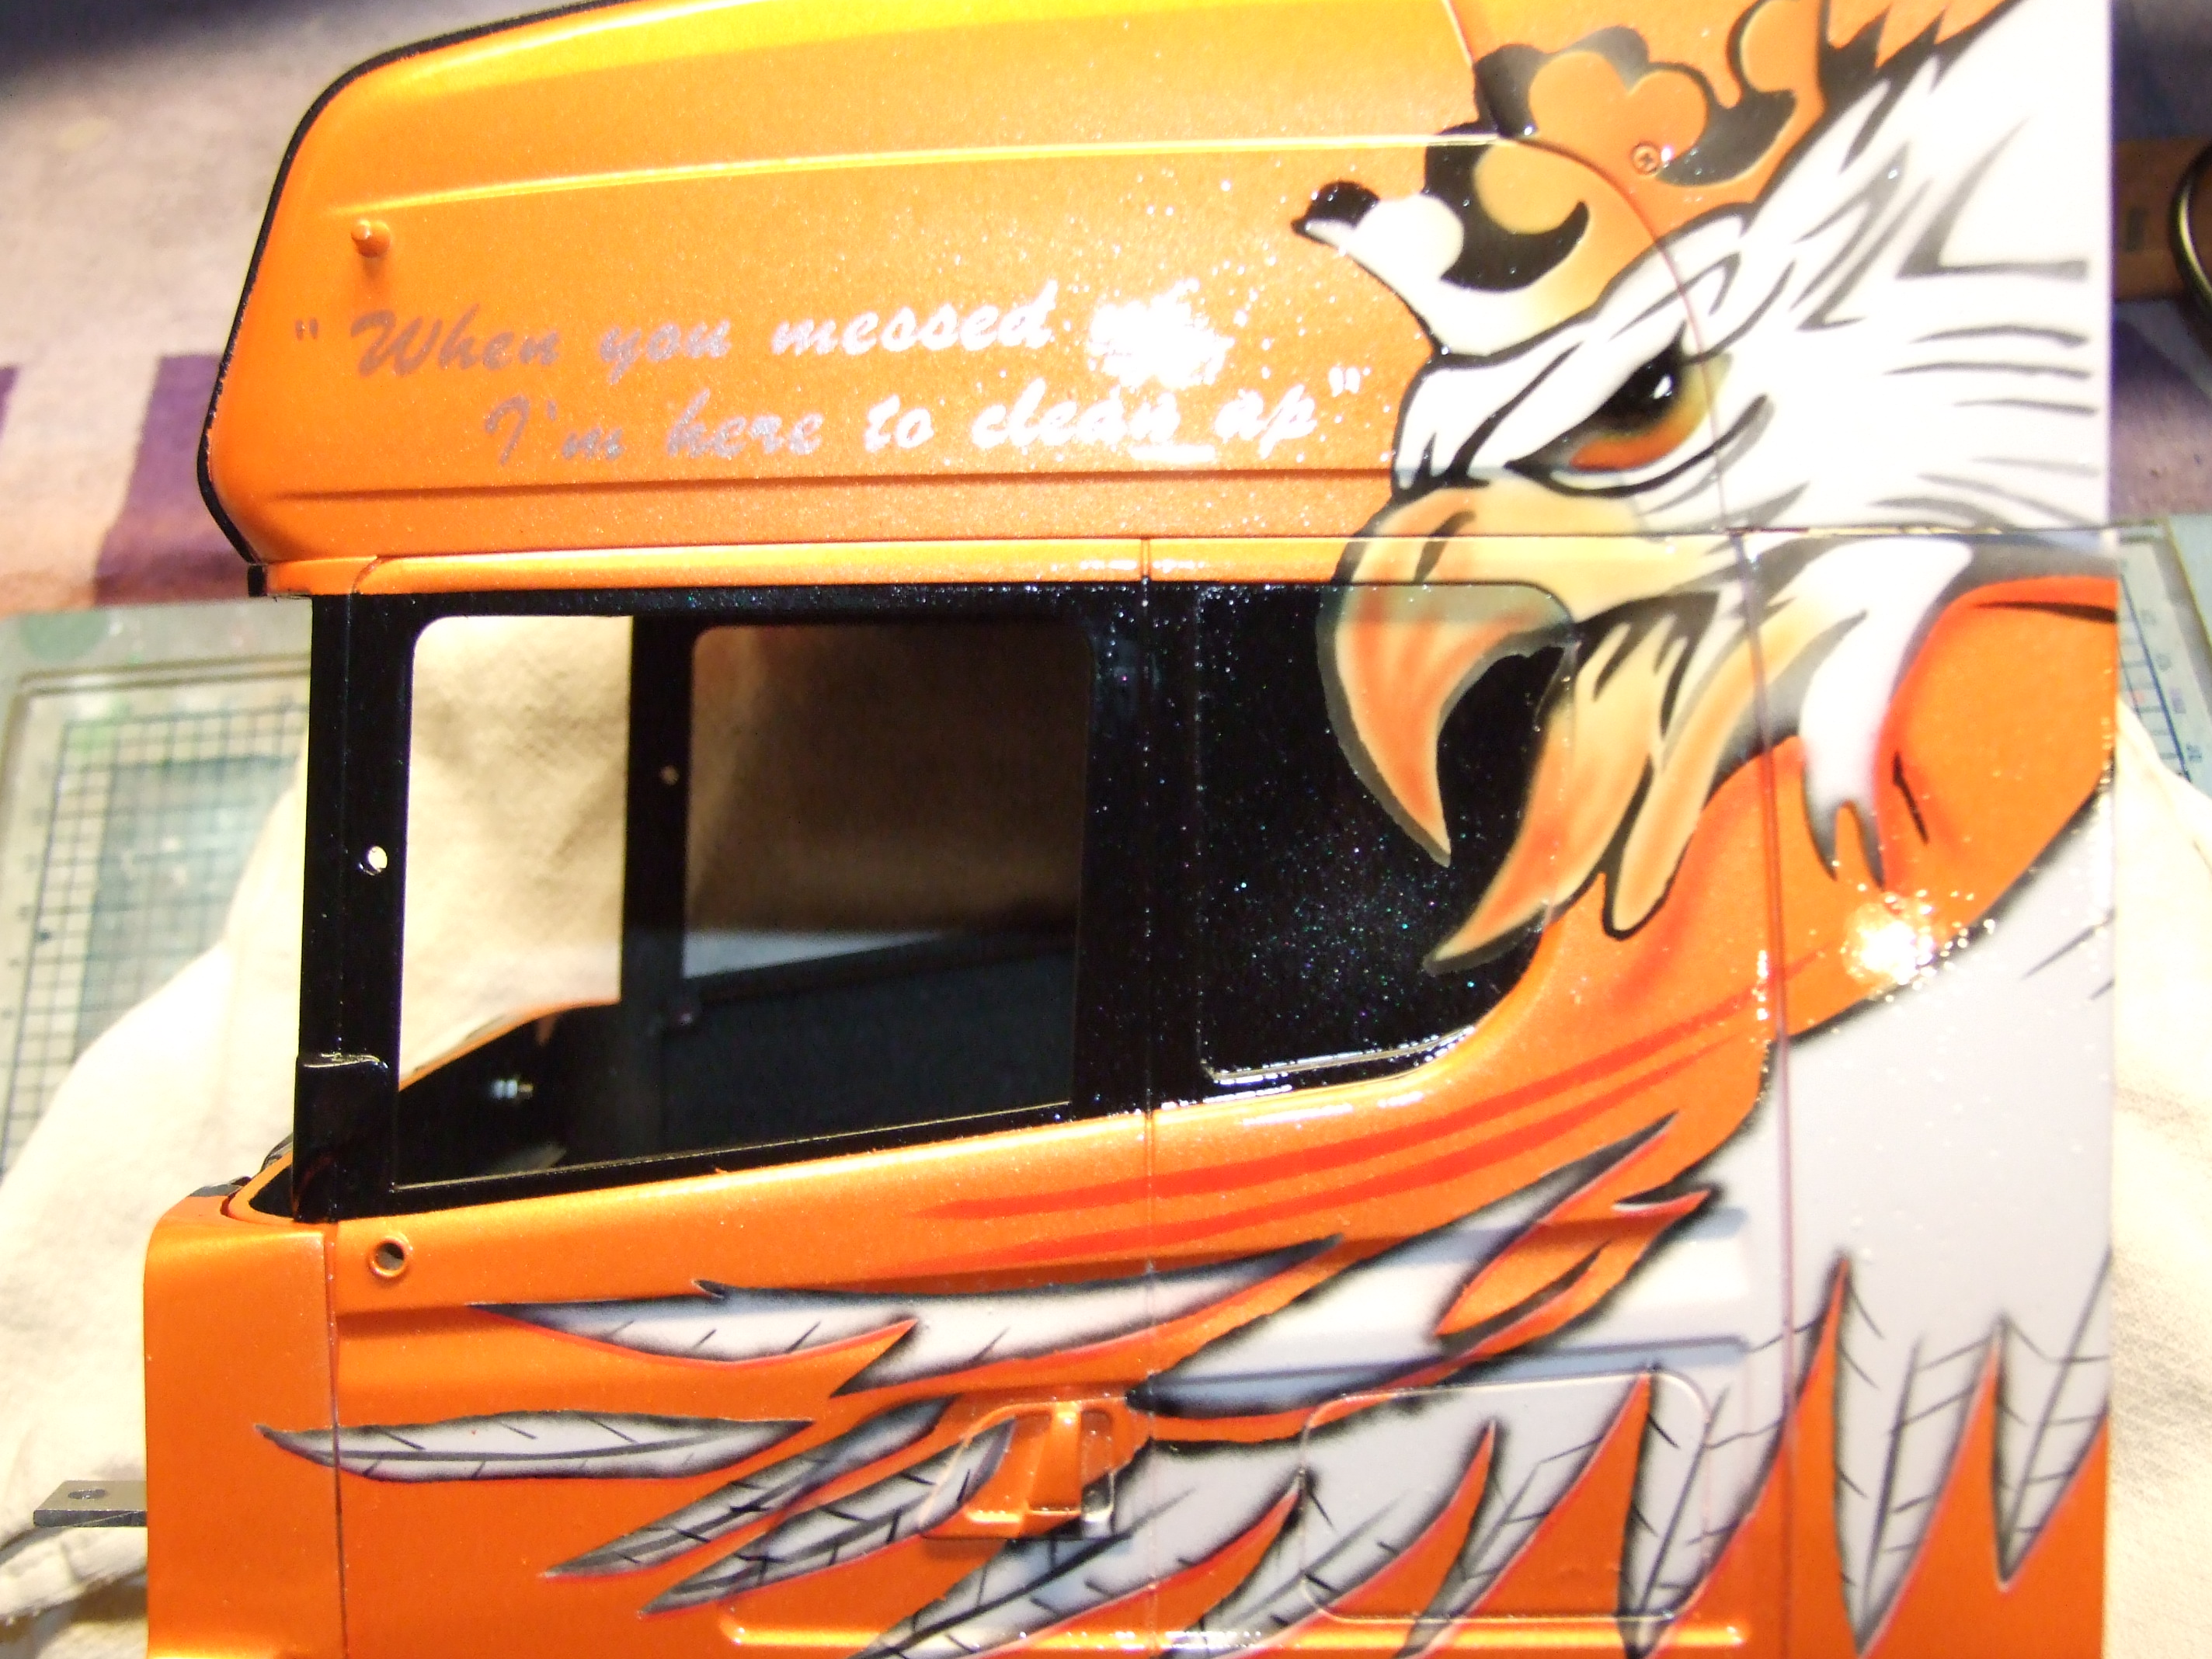
Nu je model echt volledig in kleur staat wordt het tijd om echt te laten shinen! Hiervoor gebruiken we een blanke laklaag. Je kunt er ook voor kiezen om een mat of zijdeglans blanke lak toe te passen afhankelijk van de wensen die jij hebt voor je model. Het gebruik van een blanke lak laag is altijd wel aan te bevelen. Als je model in effen kleuren gespoten is zonder metallic effecten kun je besluiten de blanke lak achter wegen te laten maar voor de bescherming van het model is het nog steeds beter om dit wel te doen.
Om een goede diepe glans laag te realiseren moeten we nu in tegenstelling tot de vorige laklagen wel met dikkere lagen gaan werken. De kunst zit hem in het balans vinden tussen een laklaag die dik genoeg is voor een diepe glans maar niet gaat lopen waardoor je druipers krijgt. Je kunt beter iets te dun spuiten dan net te dik! Als de glans niet 100% is na het spuiten kun je hem altijd nog polijsten of een extra blanke lak laag aanbrengen. Het weghalen van een druiper is veel vervelender werk.
Veel gemaakte fouten OOPS
Uiteraard kunnen er ook dingen misgaan tijdens het spuiten gelukkig zijn veel oorzaken snel te verklaren en goede leermomenten voor je volgende model. Als het alleen de verf is die niet gelukt is kun je nog overwegen om een zogeheten paint killer te gebruiken. Deze verwijderd de oude verf van je body maar het resultaat is heel erg afhankelijk van de verf en de body zelf een goed resultaat in schoonmaken is dus zeker niet gegarandeerd!
Niet goed schoongemaakt
Misschien wel de meest gemaakte fout is het niet goed schoonmaken van het model. Je kunt hierdoor verschillende problemen krijgen. Veel voorkomende problemen zijn vlekken/ vinger afdrukken in de lak. Of kraters in de lak dit laatste kan door twee dingen komen. Of je ziet vaak een zwart puntje in het midden en dan is er vuil achtergebleven op je model. Een ander veel voorkomend probleem is siliconen. Je krijgt dan een schoon kratertje vaak zelfs meerdere op je model. Dit is een erg vervelend probleem want siliconen verwijderen vergt veel tijd en geduld. Pas dus op dat je niet met handcrèmes of andere smeermiddelen werkt in de buurt van je model!
Te vochtig of te dikke laag gespoten
Als het te vochtig is dan zal de lak niet goed uitharden, de droogtijd wordt te lang wat zorgt voor meestal een witte waas in de lak. Dit zien we vooral vaak in de blanke lak laag van het model terug maar kan ook eerder al voorkomen. Bij metallic lakken zul je zien dat het metallic gaat drijven en de metaaldeeltjes naar elkaar toe komen te liggen wat zorgt voor een rommelig glitter effect.
Schuur sporen of deuken in de lak
Voorbereiding van je model is het meest belangrijke, schuur sporen die je nog ziet in je grondverf ga je niet meer weg krijgen met het spuiten. Zorg dus dat je grondlaag echt strak is dit bepaald het eindresultaat van je model.
Verf onder de tape doorgekropen
Als de tape niet goed is aangebracht dan zal de verf er al snel onder door willen kruipen. Het aanbrengen is dan ook een secuur klusje maar zorgt wel voor je eindresultaat. Een toegepaste truc is om na het afplakken eerst de oude kleur nog een keer te spuiten en dan pas de nieuwe kleur op deze manier kan de oude kleur de kleine imperfecties opvullen en valt het veel minder op.
Craquelé effect of scheuren in de lak
Dit ontstaat eigenlijk om twee redenen de meest voorkomende is dat de onderlaag niet volledig uitgehard is geweest. Vooral bij het gebruik van meerdere merken verf door elkaar heen is dit altijd een heel groot risico. Ons advies is dan ook om maar één merk verf te gebruiken. Het tweede is dat de verf te snel over elkaar heen is gespoten waardoor de onderlaag nog niet volledig uitgedampt was. De enige oplossing hiervan is het model weer kaal halen en opnieuw beginnen.