Het instellen van een FlySky Paladin PL18 zender

Het programmeren van de FlySky Paladin PL18 EV Flagship
zender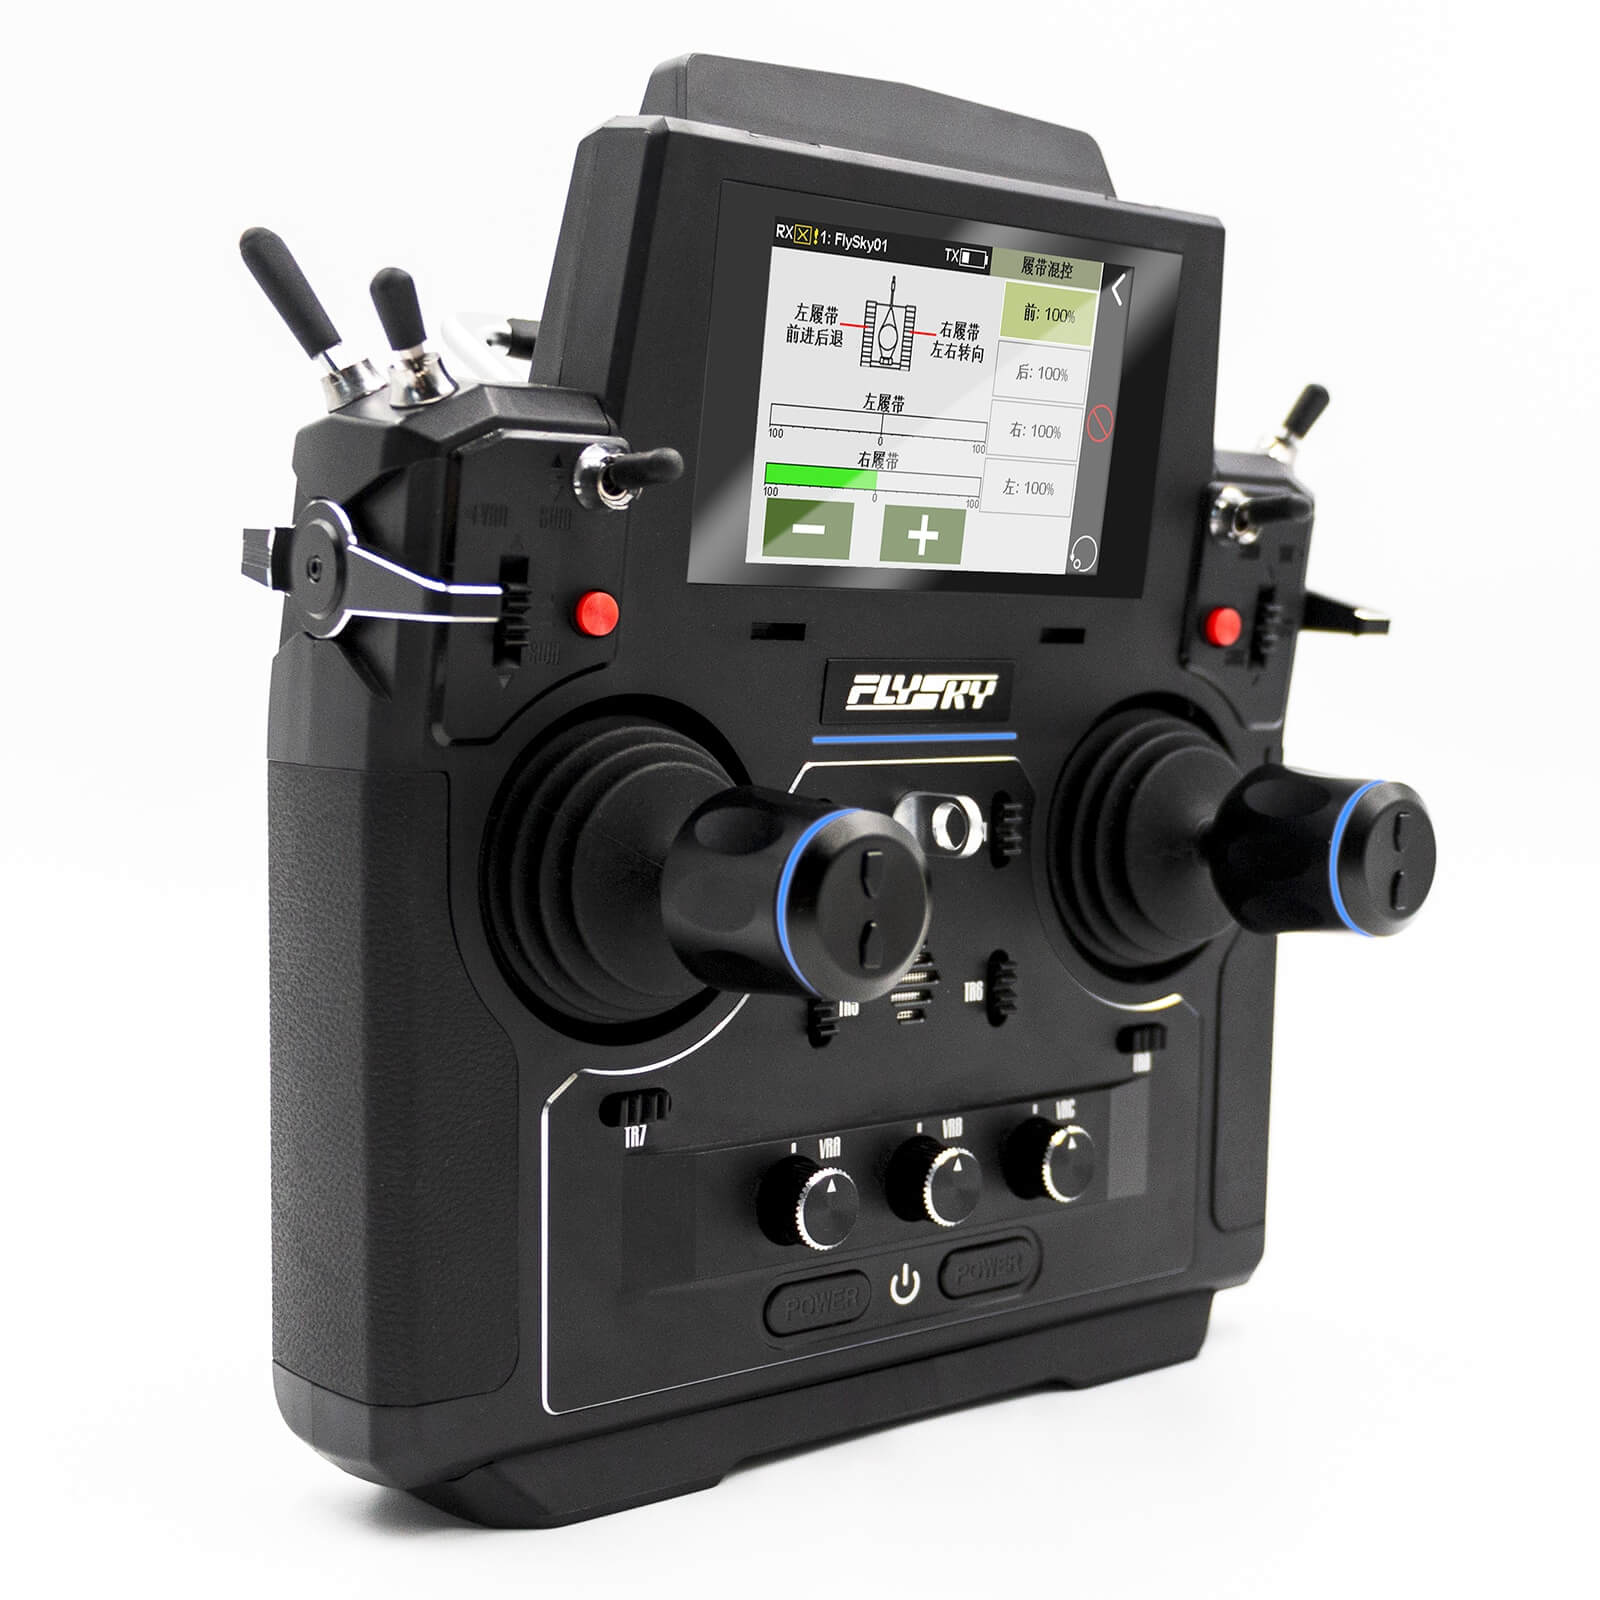
Deze week neem ik jullie mee in het programmeren en instellen van de FlySky Paladin PL18 (EV) zenders. Deze zenders zijn afgelopen jaar uitgegroeid tot misschien wel de meest populaire zender onder de truckers en liefhebbers van hydraulische graafmachines. De FlySky Paladin PL18 is een erg gebruiksvriendelijke zender maar enkele basis tips heb je wel nodig om te kunnen werken met deze zender. Dus laten we beginnen met deze nieuwe Tips&Tricks speciaal voor de FlySky Paladin PL18 liefhebbers.
Verschillende soorten ontvangers
Allereerst is het belangrijk om te weten dat FlySky meerderes oorten ontvangers gebruikt namelijk de classic (rode) en enhanced
(geel/oranje). Deze ontvangers werken beiden net even anders van elkaar.
Classis Ontvangers (Rood)
Deze ontvangers zijn maximaal 10 kanalen en het is niet
mogelijk meer dan 1 ontvanger per model te verbinden aan je zender. Ze zijn wel
erg betaalbaar en in vele formaten te verkrijgen.
Enhanced Ontvangers (Oranje en Geel)
Deze ontvangers hebben wel de mogelijkheid om met 2
ontvangers tegelijk aan 1 model verbonden te zijn, op deze manier wordt het
mogelijk de volle 18 kanalen van de zender te gebruiken.
Team Oranje VS Team Geel
Uiteraard hoor ik je denken wat is nu het verschil tussen
oranje en geel, officieel zijn de oranje ontvangers bedoeld voor vliegtuigen en
de gele voor voertuigen. Met de laatste software update kan de reguliere PL18
inmiddels gewoon beide ontvangers aan. Voor de PL18EV adviseer ik je nog wel de
gele ontvangers te blijven gebruiken!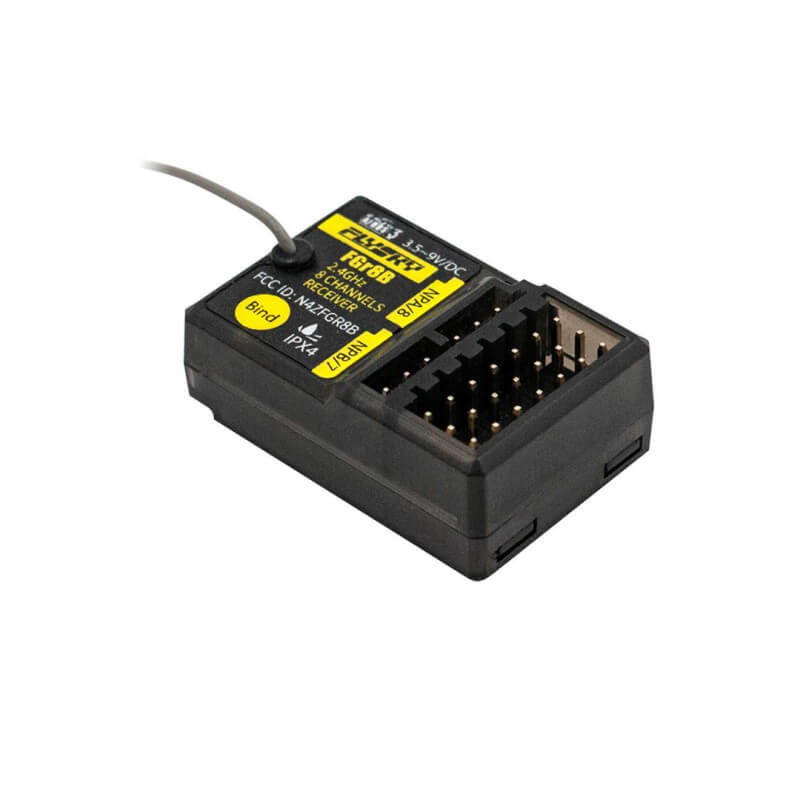
Gyro Ontvangers (Paars)
Deze ontvangers zijn een speciaaltje en voor trucks en
graafmachines eigenlijk niet nodig. De ingebouwde gyroscoop komt vooral van pas
in de snelle RC-auto’s maar die gaan we later nog een keer apart behandelen
samen met de FlySky Noble NB4 zender!
Laten we nu echt beginnen!
Oké bijna dan, als je net een nieuwe zender hebt is het
verstandig om eerst je software te updaten naar de laatste versie. De meest
recente software vind je terug op de site van FlySky zelf ook al lijken de
FlySky Paladin PL18 en Paladin PL18 EV heel erg op elkaar ze zijn toch net even anders dit merk
je onder andere terug in de software:
FlySky Paladin PL18 Firmware: Download Hier!
FlySky Paladin PL18 EV Firmware: Download Hier!
Let op: Heb je de zender al eerder geprogrammeerd of zit er
al een setup in je zender maak hier dan eerst een kopie van via de FlySky
Assistant! Bij een grote update ben je al je instellingen namelijk kwijt!
Sluit nu eerst je zender aan op de computer en start deze
op. Vervolgens start je het programma dat je zojuist hebt gedownload van Flysky
op. Je krijgt nu het volgende scherm te zien:
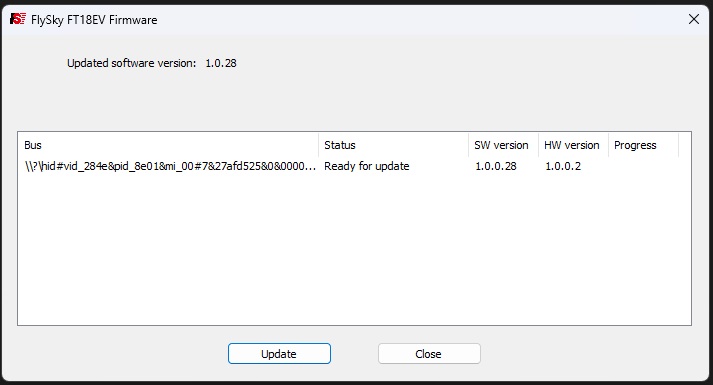
Als je nu op update drukt zal je merken dat er eigenlijk
niks gebeurt, we moeten eerst de zender in firmware update modus zetten. Dit
doen we via Menu -> Systeem -> TX Firmware Update
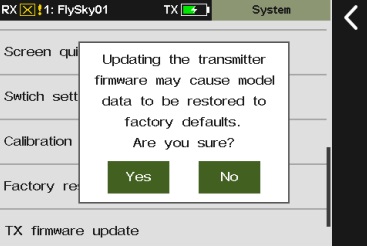
De zender zal kort ontkoppelen van de pc en opnieuw
aanmelden nu kun je op update drukken in de software. Het updaten duurt
ongeveer 3-5 minuten daarna start de zender opnieuw op. Vervolgens moeten we
onderstaande stappen uitvoeren om de zender te kalibreren:
- ST Calli.
(Calibratie Stick): Zorg dat alle knuppels en draaiknoppen in het midden staan.
Druk vervolgens op OK. Vervolgens beweeg alle knuppels en draaiknoppen tot hun
maximale uitslag en druk op < om het kalibreren af te sluiten. “Calibration
Succesfull”
- Update RF:
Zorg dat de zendmodule van je zender ook de laatste firmware versie heeft dit
gaat automatisch en nu kun je pas kiezen voor “Start using”
- Je ziet de
melding al verschijnen niet alleen je zender maar ook de ontvangers hebben
waarschijnlijk een update nodig. Dit is verschillend tussen de classic en de
enhanced ontvangers.
- Voor
updaten van de firmware op de ontvangers ga je naar Menu -> RX Setup ->
Receiver Update en kies vervolgens uw ontvanger.
Firmware update Classic Ontvangers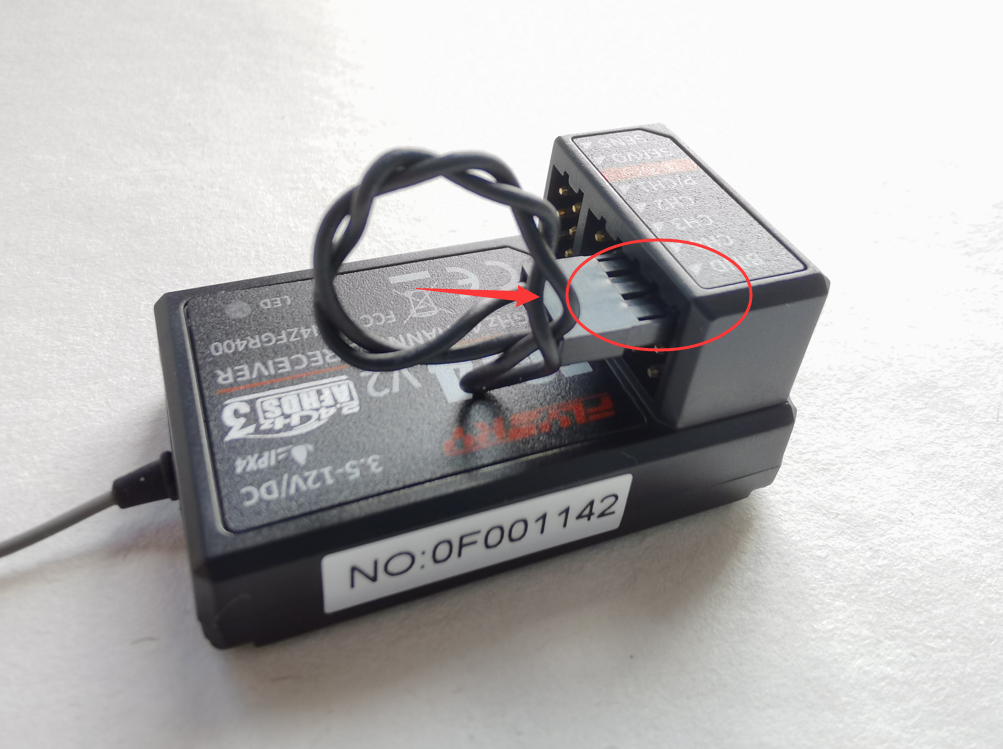
Bij de classic ontvangers werkt het updaten nog via de
bindplug op de ontvanger, voor een firmware update is het niet nodig dat de
ontvanger daadwerkelijk verbonden is met de zender want als de software niet
overeenkomt zal dit niet werken ook. Bij het updaten van de firmware moet de
stekker horizontaal in de ontvanger worden gestoken gezien vanaf de bind port.
Sluit vervolgens een ontvanger accu of voeding aan om de ontvanger op te
starten.
Firmware update Enhanced Ontvangers
Deze ontvangers werken niet langer met een bind plug maar
hebben een bind knop op de ontvanger zitten. Sluit een ontvanger accu of
voeding aan om de ontvanger op te starten. Om de software te updaten moeten we
deze ca. 10 seconde vasthouden tot de led 3x gaat knipperen. Vanaf dat moment
kan je de zender in receiver update zetten en herkent die hem verder
automatisch.
Nu we alle software up to date hebben kunnen we eindelijk
echt gaan beginnen!
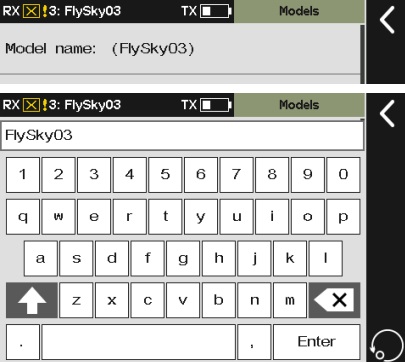
Model aanmaken
Model name
De eerste stap die we gaan zetten met deze mooie zender is
het aanmaken/ bewerken van een model. Hiervoor gaan we naar Menu -> Models.
Hier kiezen we eerst een eigen herkenbare naam.
Model structure
Hier gaan we de basis van het model samenstellen, bij de Paladin PL18 EV versie heb je ook gelijk mooie truck/ kraan opties dit is bij de
reguliere PL18 iets beperkter. Maar niet getreurd je kunt gelukkig heel snel
functies toevoegen door simpelweg de juiste opties te kiezen. Dit helpt je om
het model snel in te stellen uiteraard kun je deze functie ook negeren en zelf
elk kanaal een eigen functie geven vanuit kanaal toewijzing.
Let Op: Het achteraf aanpassen van je model structuur reset
diverse instellingen in de zender dus doe dit in 1x goed!
Tijd om de ontvanger te gaan koppelen
We gaan nu verder om de ontvanger voor het eerst te laten
communiceren met het model kies hiervoor Menu -> RX Setup -> Bind Setting
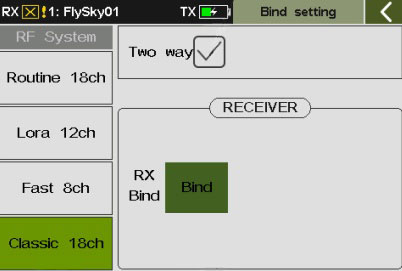
Bind Setting:
We hadden het eerder al over de Classic en Enhanced
ontvangers en dat ze anders werken.
Classic 18CH
De classic ontvangers zijn tot maximaal 10 kanalen echter kunnen wel met SBUS tot 18 kanalen uitsturen vandaar dat je in het menu ziet staan Classic 18ch. Deze optie kiezen we dan ook voor de rode ontvangers. Om de ontvanger te binden steek je de bind plug verticaal in de bind port van de ontvanger op deze manier kun je de ontvanger koppelen aan je zender.
Fast 8CH en Lora 12ch
Deze functies worden eigenlijk nooit gebruikt, fast is een
snel communicatieprotocol maar ook beperkt tot slechts 8 kanalen. Lora is
dermate specifiek dat we dit in deze tips&tricks niet behandelen.
Routine 18ch
Voor de enhanced ontvangers (geel/ oranje) gebruiken we dit
protocol, dit is de meest recente communicatiemethode van FlySky en heeft extra
mogelijkheden waaronder dus het binden van 2 ontvangers onder één model. Je
moet elke ontvanger apart binden dit doe je door de knop op de ontvanger 1-2
seconden vast te houden waardoor hij begint te knipperen. Wil je 2 ontvangers
gebruiken dan set je het vinkje Mul RX aan waarmee je een tweede ontvanger kunt
verbinden. Je geeft voor de 2de ontvanger het start kanaal op waarmee deze moet
beginnen meestal is dit kanaal 9 of 13 uitgaande van dat je eerste ontvanger
een 8 of 12 kanaals versie is.
Two Way communicatie
Deze optie maakt het mogelijk dat de ontvanger ook data
terug kan sturen ook wel bekend als telemetrie standaard staat dit aan en kun
je ook gewoon aan laten staan ook al gebruik je het niet. Het kan echter vaak
handig zijn om bijvoorbeeld de accuspanning op afstand uit te lezen of de
temperatuur van je hydrauliekpomp te monitoren. Hiervoor heb je echter wel
extra sensoren nodig naast je ontvanger.
S-Tele
Staat voor Secondary Telemetrie deze functie is verwijderd
uit de huidige firmware van de zender.
Custom Port Protocol
Voor de Beier gebruikers onder ons is dit een heel
belangrijke instelling, we kunnen hier namelijk aangeven dat we het S-BUS of
I-BUS protocol gaan gebruiken voor communicatie met de beier module. Nu horen we
vaak de vraag wat is beter? Feitelijk zijn beide systemen even goed IBUS is
alleen van FlySky zelf en SBUS is officieel van Futaba. Dit is alleen relevant
als we ook sensoren op deze bus willen gaan aansluiten. Wil je dit gebruiken samen met de Beier modules lees dan ook mijn Tips&Tricks eens over het aansluiten van de Beier Geluidsmodules!
Failsafe
Het laatste wat je wilt is dat bij een storing je model er
vandoor gaat, nu staat de FlySky Paladin PL18 standaard op geen output als de failsave
actief gaat. Voor veel elektronica is dit prima echter heeft de voorkeur om
gewoon te kiezen voor “Fixed Value 1500” dan staat het signaal altijd neutraal.
Bij sommige functies wil je dit helemaal links (1000) of rechts (2000) hebben
staan als er geen middenstand is van de functie.
PWM Frequency
Standaard wordt de Paladin PL18 geleverd voor analoge servo’s (50
Hz) dit is voor velen ook meer dan prima. Een hogere frequentie zorgt voor een
snellere reactie maar de kans op brommen is ook vrij groot. Ook kun je de
frequentie alleen verhogen als je alleen maar digitale servo’s gebruikt in je
model iets wat zelden voorkom bij modelvrachtwagens.
Overige functies
We hebben bewust een paar functies overgeslagen om deze
Tips&Tricks niet onnodig lang te maken de overige functies zijn ofwel
dermate zelf verklarend of niet nodig om te gebruiken voor de gemiddelde
gebruiker. We gaan dus snel verder!
Oké en nu kunnen we eindelijk beginnen?
Bijna! Je zal merken dat de led op de ontvanger constant
brand maar het kan zijn dat je servo’s of regelaars nog niet reageren op je
knuppels. Vaak wordt er door de zender al wel functies toegewezen aan de
diverse kanalen en joysticks maar is dit niet zoals je het zelf wilt gebruiken.
We gaan nu dus zorgen voor onze eigen indeling. Het beste werkt dit om voor
jezelf eerst een lijstje te maken met welke functies je allemaal moet
aansluiten en op welk kanaal je deze wilt gaan zetten.
Hieronder een kort voorbeeld van een standaard vrachtwagen
model op de FlySky Paladin PL18 EV:
| Kanaal | Functie | Bediening | Omschrijving |
| 1 | Stuur | J1 | Rechter Knuppel Horizontaal |
| 2 | Gas | J3 | Linker Knupper Verticaal |
| 3 | Schakelen | SWE | Schakelaar links Bovenop |
| 4 | |||
| 5 | Verlichting | SWB | Schakelaar 3 Standen Links van Scherm |
| 6 | Verlichting 2 | SWD | Schakelaar 3 Standen Rechts van Scherm |
| 7 | Motor Start | SWF | Schakelaar links onder |
| 8 | Claxon | SWH | Schakelaar rechts onder |
| 9 | Volume | VRC | Rechter Draaiknop |
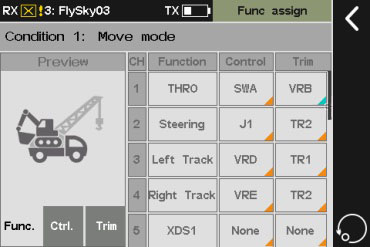
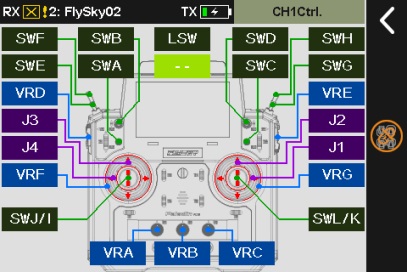
Func Assign
Nu we weten hoe we de zender willen gebruiken gaan we
beginnen met het programmeren van de functies. Onder Func Assign gaan we de
zender vertellen welke functie waar moet komen dit kunnen we doen met de naam
van de functie of zelf eigen namen toe te wijzen aan de kanalen. In de tweede
rij geven we de bediening aan veelal de joystick of schakelaar op de zender.
Voor de variabele functies zoals joysticks en draaiknoppen dien je zelf de
juiste functie te selecteren gelukkig is de digitale kaart in de zender erg
overzichtelijk waardoor je snel de juiste functie hebt. Wil je een schakelaar
toewijzen dan is het zelfs nog makkelijker en hoef je de betreffende schakelaar
alleen maar even kort te bedienen en herkent de zender het automatisch.
Voor een stuur functie kan het prettig zijn om de trim
schakelaar te gebruiken deze kun je dan ook toewijzen in de derde kolom. Op
deze manier kunnen we alle 18 de kanalen toewijzen naar eigen wens. Wel houden
we eigenlijk altijd de eerste 4 kanalen beschikbaar voor de knuppels maar dit
is dus niet noodzakelijk met de Paladin zender.
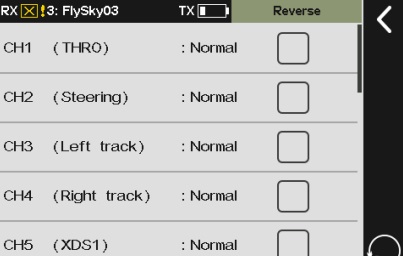
Reverse Function
Uiteraard kan het handig zijn als je stuur verkeerd om staat
om deze makkelijk om te draaien dit kunnen we gelukkig snel en eenvoudig doen
in het reverse menu. Het is zo simpel als het aanzetten van een vinkje bij het
betreffende kanaal en de functie beweegt precies andersom.
End Points
Naast het omdraaien van het kanaal kan het handig zijn om te
zorgen dat je servo of regelaar niet meer aanstuurt dan noodzakelijk. Vooral
servo’s vinden het niet fijn als ze mechanisch niet verder kunnen maar je ze
wel vraagt om verder te gaan. Dit zorgt veelal voor het bekende brom geluid dat
de servo blokkeert. Gelukkig kun je dit eenvoudig aanpassen door het signaal te
beperken in de maximale uitslag van het betreffende kanaal. Bij een servo is
dit makkelijk te doen door te luisteren naar het geluid dat de servo maakt als
je volledig stuurt bijvoorbeeld. Hoor je de servo knerpen dan is de uitslag nog
te groot. Is die lekker rustig stil op het einde van zijn slag dan staat die
goed.
We hebben nu alle basis functionaliteit alweer gehad, de
komende stukken gaan vooral over de speciale functies die gebruikt worden voor
hydraulische machines en modellen met heel veel functies.
Servo Display
Nu wil je natuurlijk ook kunnen zien of je de instellingen
goed hebt toegepast of dat je ergens wat bent vergeten. Gelukkig is de PL18
daarop goed voorbereid, in het menu Servo Display kun je snel en overzichtelijk
de bediening van alle functies zien. Ook eventuele wijzigingen kan je zo snel
testen zonder je model aan te zetten.
Let op: Er zit een servo test functie in de zender die alle
18 kanalen tegelijk uitstuurt, als dit in je echte model gebeurt dan kan dat
voor ongelukkige situaties zorgen dus gebruik deze functie alleen in een test
opstelling!
Pro Mixes
Als we met hydrauliek gaan werken dan ontkomen we bijna niet
aan het gebruik van mix functies in de zender. Op het eerste gezicht lijkt dit
heel moeilijk maar gelukkig is de Paladin PL18 zender een allemans vriend dus
ook hier ga ik je snel doorheen loodsen.
- We
beginnen met het toewijzen van de pomp op een vrij kanaal (bijvoorbeeld kanaal
10) als we dit hebben gedaan dan gaan we dit kanaal eerst bedienen met een van
de draaiknoppen. Zelf gebruik ik bij voorkeur de “VRA knop” (meest linker
draaiknop).
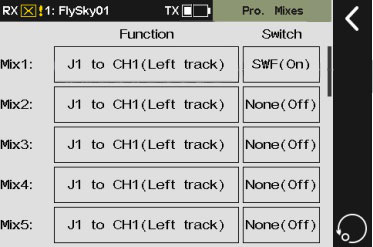
- We gaan nu
de mixer toewijzen aan een van de ventielen op de knuppels. Laten we als
voorbeeld de big arm nemen op kanaal. Dan kiezen we bij de Pro Mixers om Mix1
te gebruiken. Vergeet niet de meest belangrijke stap om de mixer ook eerst te
activeren. Dit doe je door een schakelaar toe te wijzen of voor “close” te
kiezen onder de switch functie op deze manier staat je mixer altijd actief
namelijk. Laat je hem op “None (off)” staan dan zal de mixer niks doen
- In Mix1
stellen we het volgende in
- Master = Func = “Big Arm”
- Slave = Func = “Hyd. Pump”
- Curve = Line Type = “3 Point /”
- We zien nu een rode lijn diagonaal door het scherm. We gaan de meest linker punt op +70% zetten en de meest rechter punt ook op +70%. Op deze manier krijgen we een mooie V op het scherm te zien.
Laten we
eens gaan kijken in de Servo Display hoe dit precies onze hydrauliekpomp
beinvloed. Je zal zien dat de bediening van de knuppel zorgt voor uitslag van
de hydrauliekpomp functie. Maar ook kan je hem met de draaiknop handmatig
bijstellen mocht je toch net even dat extra vermogen nodig hebben. Veel mensen
hebben hun hydrauliek pomp standaard veelte hoog staan dit zorgt alleen maar
voor onnodig slijtage, energieverbruik en geluid. Het is beter om je pomp
rustiger te laten lopen de exacte mix percentages hangen heel erg af van jouw
model. Een goede beginwaarde is 70% je kan deze dan later langzaam terug
brengen naar beneden. Op deze manier zorg je er ook voor als je 2 functies of
meer tegelijk gebruikt dat de pomp meer vermogen gaat leveren omdat deze bij
elkaar worden opgeteld.
Je hebt nu geleerd hoe je de hydraulische functies kan
programmeren in de zender laten we eens gaan kijken hoe we meer functies kunnen
bedienen met de zender en echt de volledige mogelijkheden gaan benutten!
Conditions
Dit is misschien wel een van de meest geavanceerde functies
van de zender. Doormiddel van “conditions” kunnen we de knuppels en schakelaars
in een meer lagen systeem gebruiken. In conditie 1 standaard de “Move Mode”
genoemd zetten we over het algemeen de basisfuncties van het rijden van het
betreffende model. In conditie 2 krijgen we “Work Mode” deze gebruiken we
vooral voor de technische functies in het model. Uiteraard ben je geheel vrij
om dit volledig naar eigen wens in te delen. Bij de reguliere Paladin Pl18 heb
je de mogelijkheid om tot wel 5 lagen toe te voegen in het menu!
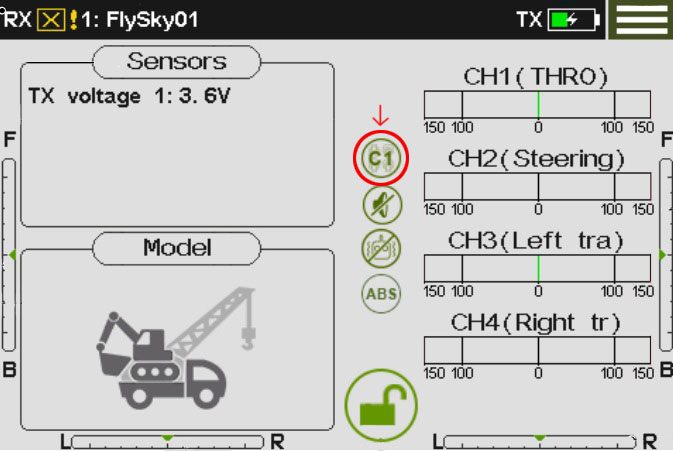
Conditions wisselen
Het wisselen van de “conditions” doe je door aan “work mode”
een schakelaar toe te wijzen. Zelf is mijn voorkeur om een van de rode
drukknoppen hiervoor te gebruiken. Als we dit hebben toegewezen kunnen we in
het scherm zien dat C1 in C2 veranderd en andersom dit staat voor de diverse
“conditions” waarin de zender werkt. In sommige menu’s wordt het volledige
“Move Mode” of “Work Mode” getoond maar vaak zie je dit alleen aan het kleine
C1 of C2 logo.
Conditions programmeren
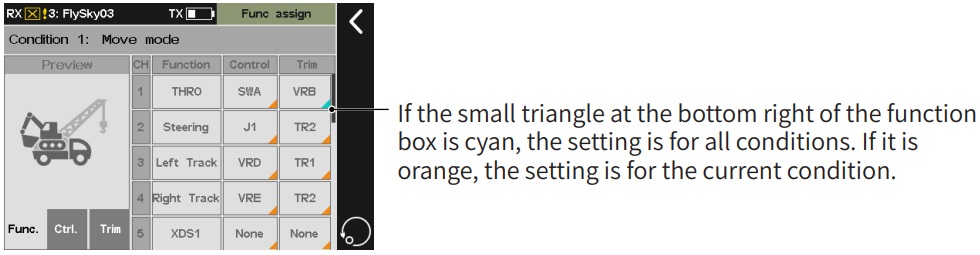
Func Assign
De conditions hebben vooral een invloed op de bediening van
de zender, dit is dus ook waar je ze het meeste terug gaat vinden. De “Func
Assign” is hierin wat speciaal want je kan de toewijzing op zowel beide
“conditions” van toepassing laten zijn als bij maar 1. Dit kun je gelukkig snel
zien door de kleur van de functie. Het driehoekje rechtsonder geeft aan of het
voor alle “conditions” is (cyaan) of alleen voor de huidige “condition”
(oranje). Boven in het scherm kunnen we direct zien dat we op dit moment in de
“Move mode” aan het instellen zijn.
Pro Mixes
Bij het hoofdmenu van de mixers is helaas niet te zien in
welke “condition” je zit dus zorg er goed voor dat je weet welke “condition”
actief is voordat je begint met programmeren van deze mixers. Je zal merken als
je de schakelaar hebt toegewezen of hebt gekozen voor “close” dat als je van
conditie veranderd deze optie verdwijnt. Normaal schakelen we dan ook tussen
het rijden van het model zonder hydrauliek en bijvoorbeeld de autolaadkraan
waarbij we wel de mixers voor hydrauliek willen hebben.
Als we de mixer echt gaan programmeren zien we gelukkig wel
weer staan in welke “condition” we zitten van de zender. Ook hier kun je per
“condition” de voorwaarden instellen hoe de zender moet reageren.
Veel plezier met je nieuwe zender!
Nu we alles hebben ingesteld en je ook deze Tips&Tricks
weer volledig hebt gelezen ben je weer een stap dichterbij als het komt op het
worden van een ervaren modelbouwer. We zijn uiteindelijk allemaal ergens
begonnen en onze hobby zit vol met techniek. Ik hoop dat je weer veel wijzer
bent geworden van deze uitleg en je nu in staat bent om de basis van de FlySky
Paladin PL18 zender te programmeren. Uiteraard zal niet alles gelijk lukken dus
maak af en toe een backup van je instellingen die wel werken zo behoudt je de
basis van een werkende configuratie van jouw model.
In een vervolg Tips&Tricks gaan we nog dieper in op de
werking van deze zender dan behandelen we ook functies zoals de track mixer,
hydrauliek modellen met een regelaar zonder achteruit. Expo functies en nog
veel meer. Zie ik jou dan ook weer!
Gr. Arcee